The holiday season is a time of joy, giving, and creating lasting memories. One of the most heartfelt ways to express your love and appreciation for friends and family is by giving handmade gifts. DIY holiday candles are a perfect blend of personalization, creativity, and practicality. This guide will walk you through the process of creating beautiful, personalized holiday candle gifts. We will cover the benefits of DIY candles, the materials you need, step-by-step instructions, and creative customization tips to ensure your gifts are memorable and cherished.
Benefits of DIY Holiday Candle Gifts

Personal Touch
One of the most significant advantages of DIY holiday candle gifts is the ability to tailor them to the recipient’s tastes and preferences. You can customize the scents, colors, and decorations to reflect their personality and style. Adding a personal touch to your gifts shows that you put thought and effort into creating something special just for them, enhancing the sentimental value of the gift.
Cost-Effective
Creating your own candles can be much more cost-effective than purchasing high-end, commercially made candles. By buying materials in bulk, you can make multiple gifts at a fraction of the cost. This is particularly advantageous during the holiday season when you may need to give gifts to numerous people.
Creative Expression
DIY candle making is an excellent opportunity to showcase your creativity and craftsmanship. From selecting the perfect fragrance combinations to designing unique labels and packaging, each step allows you to express your artistic side. The result is a one-of-a-kind gift that stands out from mass-produced items.
Types of DIY Holiday Candles
Container Candles
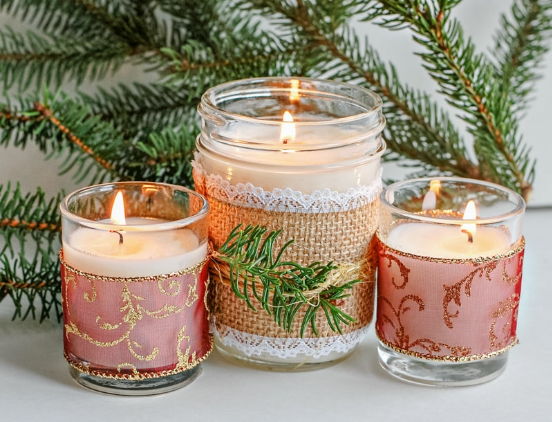
Container candles are one of the easiest and most popular types of candles to make, especially for beginners. They involve pouring melted wax into a container, such as a mason jar, teacup, or any heat-resistant vessel. These candles are versatile and can be customized with various scents, colors, and decorations.
Pillar Candles
Pillar candles are freestanding candles that require molds for shaping. They are often used for decorative purposes and can come in various sizes and shapes. Making pillar candles requires a bit more skill and the right equipment, but the results can be stunning and sophisticated.
Floating Candles
Floating candles are designed to float on water, making them perfect for creating a festive table setting or a relaxing bath ambiance. They are typically smaller and shaped to ensure they float properly. These candles can add a magical touch to any holiday celebration.
Scented Candles
Scented candles add an aromatic dimension to your holiday gifts. The fragrance can evoke memories and create a cozy atmosphere. Popular holiday scents include cinnamon, pine, vanilla, peppermint, and gingerbread. By using essential oils or fragrance oils, you can create a variety of delightful scents.
Materials and Tools Needed
Wax Types
Choosing the right type of wax is crucial for your candle-making project. The most common waxes used for DIY candles are:
- Soy Wax: Made from soybeans, it burns cleanly and is eco-friendly.
- Beeswax: Natural and has a subtle honey scent; it burns longer and cleaner than paraffin.
- Paraffin Wax: Widely available and affordable, but it produces more soot and is less eco-friendly.
- Coconut Wax: Known for its excellent scent throw and clean burn, but it can be more expensive.
Wicks
The wick is an essential component of your candle, affecting how it burns. Common wick types include:
- Cotton Wicks: Most common and suitable for various candle types.
- Wood Wicks: Provide a rustic look and create a soothing crackling sound when burned.
Selecting the appropriate wick size and type is crucial to ensure a clean and even burn.
Containers and Molds
The container or mold you choose will shape your candle and influence its appearance. Options include:
- Glass Jars: Classic and versatile, suitable for container candles.
- Silicone Molds: Ideal for creating various shapes for pillar and floating candles.
- Recycled Containers: Adding a sustainable element by reusing teacups, tins, or other heat-resistant items.
Ensure your containers and molds are heat-resistant and safe for candle making.
Fragrance Oils and Essential Oils
Fragrance oils and essential oils add scent to your candles. Essential oils are natural and derived from plants, while fragrance oils are synthetic and offer a broader range of scents. Popular holiday scents include:
- Cinnamon
- Pine
- Vanilla
- Peppermint
- Gingerbread
Use these oils in appropriate amounts to avoid overpowering the candle’s scent.
Dyes and Additives
Adding color to your candles can enhance their visual appeal. Types of candle dyes include:
- Liquid Dyes: Easy to mix and offer vibrant colors.
- Block Dyes: Provide strong colors and can be broken into pieces for custom shades.
- Powdered Dyes: Offer intense color and are suitable for all wax types.
You can also add decorative elements like glitter, dried flowers, or spices to create unique and festive candles.
Step-by-Step Guide to Making DIY Holiday Candles
Preparation
Set up a clean, organized workspace away from pets and children. Ensure your area is well-ventilated, and gather all necessary materials and tools. Cover your work surface with newspaper or a protective cloth to catch any spills. Wear protective gloves and an apron to prevent burns and protect your clothing.
Melting the Wax
- Double Boiler Method: Fill the bottom pot of your double boiler with water and bring it to a gentle simmer. Place the wax in the top pot and allow it to melt slowly, stirring occasionally to ensure even melting.
- Microwave Method: Place the wax in a microwave-safe container and heat in short intervals (30 seconds to 1 minute), stirring between each interval to prevent overheating.
Use a thermometer to monitor the wax temperature, ensuring it reaches the appropriate melting point for the type of wax you are using.
Adding Fragrance and Color
Once the wax is fully melted, remove it from the heat source. Add your chosen fragrance oils or essential oils, typically at a rate of 1 ounce per pound of wax. Stir thoroughly to distribute the scent evenly. Next, add your dye, starting with a small amount and gradually increasing until you achieve the desired color. Mix well to ensure the color is consistent throughout the wax.
Preparing Containers and Molds
Secure the wick in the center of your container or mold using a wick holder or by attaching it to a pencil or chopstick laid across the top. Preheating your containers slightly can help prevent cracks or shrinkage as the wax cools.
Pouring the Wax
Carefully pour the melted wax into the prepared containers or molds, avoiding air bubbles by pouring slowly and steadily. If air bubbles appear, gently tap the container on the countertop to release them. Ensure the wick remains centered and upright during this process.
Setting and Trimming
Allow the candles to cool and set completely, which can take several hours. Once fully hardened, trim the wick to approximately 1/4 inch above the candle surface to ensure a clean and safe burn.
Creative Ideas for Customizing Holiday Candles
Layered Colors
Creating layered candles can add visual interest and complexity. Pour the first layer of colored wax and allow it to set slightly before adding the next layer. Repeat this process, using different colors for each layer to achieve a beautiful, striped effect. For an ombre look, gradually increase the amount of dye in each subsequent layer.
Decorative Elements
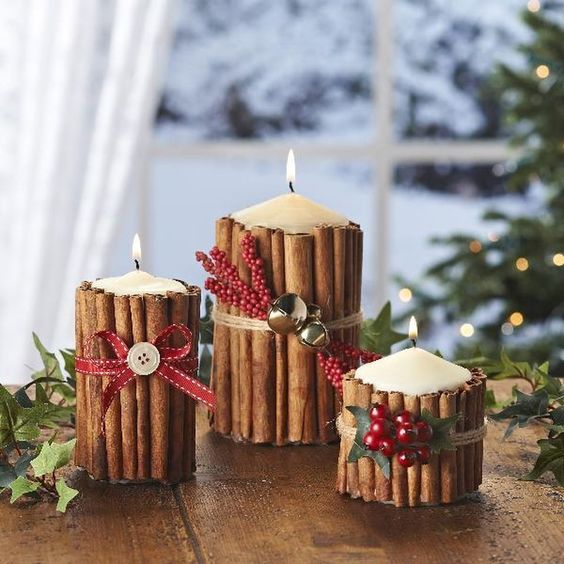
Enhance your candles with decorative elements such as dried flowers, herbs, or spices. These additions can be embedded in the wax or placed on top before the wax fully sets. Holiday-themed decorations like pine cones, cinnamon sticks, or small ornaments can add a festive touch.
Personalized Labels and Packaging
Design custom labels with holiday greetings, personalized messages, or the recipient’s name. Use festive fonts and colors to match the holiday theme. Creative packaging, such as gift boxes, wrapping paper, or reusable containers, can make your candle gifts even more special.
Scent Combinations
Experiment with different essential oil blends to create unique holiday scents. Combinations like cinnamon and clove, peppermint and eucalyptus, or vanilla and nutmeg can evoke the holiday spirit. Ensure you follow safety guidelines for blending essential oils to maintain a balanced and pleasant fragrance.
Presentation and Gifting Ideas
Gift Sets
Create gift sets by combining different types of candles, such as container candles, pillar candles, and scented candles. Include complementary items like matches, candle holders, or a candle care kit. Arrange the items in a decorative gift box or basket for a cohesive and thoughtful presentation.
Themed Gifts
Design candles around specific holiday themes, such as Christmas, Hanukkah, or New Year’s. Coordinate the colors, scents, and decorations to reflect the chosen theme. For example, use red and green colors with pine and cinnamon scents for a Christmas-themed candle.
Eco-Friendly Packaging
Use recyclable or reusable materials for packaging to emphasize sustainability. Consider wrapping candles in fabric scraps, reusable bags, or eco-friendly paper. This adds an extra layer of thoughtfulness and aligns with environmentally conscious values.
Personalized Messages
Include handwritten notes or holiday wishes with your candle gifts. Adding a personal touch, such as a favorite quote, memory, or a heartfelt message, can make the gift even more meaningful. Incorporating photos or small mementos can also enhance the personal connection.
Troubleshooting Common Issues
Wax Issues
Common problems like cracks, frosting, or uneven surfaces can occur. To fix these:
- Cracks: Reheat the surface with a heat gun to smooth it out.
- Frosting: Gently warm the candle with a heat gun to reduce the frosted appearance.
- Uneven Surfaces: Pour a small amount of melted wax over the top to create a smooth finish.
Wick Problems
Ensuring proper wick placement and burning is crucial. If the wick is off-center, use a wick holder to keep it in place while the wax sets. If the candle is burning unevenly, trim the wick to the correct length and ensure it’s the appropriate size for the candle.
Scent and Color Issues
Balancing fragrance strength can be challenging. If the scent is too strong, reduce the amount of fragrance oil. If it’s too weak, slightly increase the amount, keeping within safe usage guidelines. For color consistency, mix the dye thoroughly and test small batches before committing to a large batch.
Conclusion
Recap of Key Points
DIY holiday candle gifts offer a personal, cost-effective, and creative way to spread holiday cheer. By understanding the benefits, types of candles, materials needed, and step-by-step process, you can create beautiful, customized candles that reflect your thoughtfulness and care.
Encouragement to Start Crafting
Making your own holiday candles is a rewarding and enjoyable experience. It allows you to create unique gifts that will be cherished by your loved ones. Embrace the process and enjoy the satisfaction of crafting something special with your own hands.
Final Thoughts
Handmade gifts carry a special meaning, especially during the holiday season. By creating DIY holiday candle gifts, you are not only giving a beautiful and functional item but also a piece of your creativity and love. Share your creations and spread the warmth and joy of the holidays with your personalized candle gifts.


